Ahoy thar!
Nay, yer eyes donae deceive ye, it be me!
Thought I was dead did ye? Well ye be not far from the truth..... methinks it be time to find me buried treasure and retire to a comfortable little cove on skull island......
To be honest, I've been out of 40k for a while now, and that's fairly comprehensively killed my motivation to scratch-build anything for the game, or to update the proxy templates.
However, I'd like to keep this up as a resource for others. I've updated the Paperhammer 40k archive with some more templates and re-uploaded it to Google drive, so the link is now live again. Please, if you notice any more dead links, send me an email at 40kpirate@gmail.com, and I'll get it back online as soon as I see it.
Thanks everyone for your interest and support in this little project of mine. It's been fun, and I hope I've helped a few of you along the way.
I wish ye fair winds and bountiful loot on yer way.
Happy scratchbuilding!
40k Pirate

Friday, April 26, 2019
Monday, October 5, 2015
Change o' Coffers!
Ahoy thar!
It has come to me attention that me treasure chests me rotting and I be losing loot! It be time to get meself some new coffers methinks!
(Translation: For some reason my computer will no longer upload files to FileFactory, so I cannot replace the templates once they go offline every three months or so. Therefore, I've decided to switch to Google Drive. As far as I know, all the links should stay up for the foreseeable future. Should you find a link stops working, please let me know at 40kpirate@gmail.com).
Thar ye go - all ship-shape once more!
Aargh!
40k Pirate
Thursday, May 14, 2015
How to Scratch Build a Devilfish
Ahoy thar!
This tutorial shows you how to complete a slightly more difficult scratch build from the Paperhammer archive - the devilfish transport. Of course, with slight modifications and the addition of a turret, this could also serve as the body for a skyray or hammerhead tank.
.JPG)
I apologise in advance for any unclear or confusing steps in this tutorial. I did not build this model myself, but am typing up the tutorial from pictures and notes taken by my brother. I tried my best, but if you find a step that doesn't make sense, feel free to shoot me an e-mail and I'll ask my brother to clarify it.
With that out of the way - on with the tutorial!
What you will need:
-PaperHammer 40k.rar (Credit to the Golden Bolter Society)
-Paper and/or cardboard (In this tutorial everything was printed on 200GSM paper-card, with cereal box used here and there as reinforcing.)
-Scissors, knives and any other pointy, sharp objects you can find!
-Paper glue (I use super glue)
-Tooth picks
-Bamboo skewer (Realistically you could use any appropriately sized solid cylindrical object.)
1- First, find the devilfish template in 'PaperHammer 40k\Tau\Devilfish', and cut out the front part of the main hull from page 2.
.jpg)
- Then fold down along the black lines, away from yourself, so you can see the black line as you fold.
Reverse the fold along the dotted lines, so that you are folding towards yourself, and you cannot see the dotted lines as you fold.
(TIP: When working with paper-card I have learnt that gently scoring along the lines before you fold makes for a much neater fold. Of course, you then have to be careful not to cut all the way through the paper.)
.jpg)
- Glue the 'nose' together like so:
.jpg)
- Cut out these strips. There should be a pair at the top and bottom of page 2.
.jpg)
- Glue these strips to the 'inside' of each wing, and use them to join the top and bottom half of the piece.
.jpg)
.jpg)
.jpg)
- At this point cardboard was added for extra support.
.jpg)
- Finally, cut out and glue on the details from page 2 finish off the front part of the main hull.
.jpg)
.jpg)
.jpg)
.jpg)
2- Next, cut out the burst cannon pieces from page 2, and prepare four toothpicks by blunting them and cutting them all to the same size.
.jpg)
- Unfortunately, no step-by-step pictures were taken during the building of the burst-cannon, but it looks fairly straight-forward. First, fold the 'flower'-looking-piece and cap it with the octagon to it's right. Then, poke holes through the small circles on the burst-cannon barrel-pieces, and run the toothpicks through them to form the barrel (make sure it looks the same as the drawn diagram on page 2).Finally, assemble the rectangular prism, glue the face to the back of the burst-cannon, and use it to attach the two pieces.
.jpg)
- At this point we chose to attach the burst-cannon to the front of the main body. While you could just glue it, we prefer to have the ability to remove and rotate weapons. To achieve this, use a chopstick to poke a hole in the burst-cannon, but leave the chopstick in the hole. Then, position the burst-cannon where you would like it to be. Once you've found a good position, remove the chopstick from the burst-cannon and glue it in place.
Finally, pour a layer of superglue on the top of the burst cannon, ensuring that plenty is applied to the edges of the hole you created. This should harden and make the joint more durable.
.jpg)
3- Now, cut out the back part of the main hull from page 3.
.jpg)
- Unfortunately no step-by-step instructions were taken for the assembly of this piece, but it looks like a relatively straight-forward shape (I have placed pictures from the next few steps here as well just to give you a better idea of the shape).
.jpg)
.jpg)
.jpg)
.jpg)
- Next, take the details from page 3 and add them to the roof.
- Then take the circular doors from page 3, cut them out, and glue them on the back and sides of the rear hull. To add extra detail, score along the dotted lines before gluing the doors on.
(Personally, I think the doors need to be glued to cardboard for extra thickness to make them stand out a little more. However, the maker of this particular model disagrees.)
.jpg)
.jpg)
.jpg)
.jpg)
- Once again, there are no step-by-step instructions for the assembly of this part, but it looks to be a fairly simply prism shape.
.jpg)
- To finish off the rear hull details (for now) cut out the landing gear parts found in the top right-hand corner of page 3 (whether you bulk this particular detail out with cardboard is up to personal preference).
.jpg)
- These belong on the corners of the devilfish bottom, wrapping onto the back and side.
Cut out the inner box-like parts of the landing gear except for the part that is labeled '1.5mm'. You will need to glue the 'grid' to this part.
Once the grid is glued on, cut out and glue the rectangles into place on the 'grid'.
.jpg)
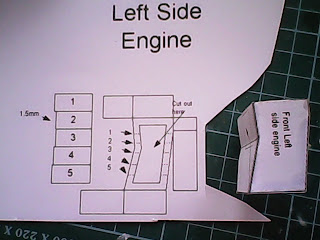
4- Now we will assemble the engines, starting with the left engine. Cut out the main engine body on page 5.
.jpg)
- Assemble by folding normally (so that the black line is visible as you fold) and gluing together like so:
.jpg)
- Next, cut out these two shapes from the engine sheet:
.jpg)
- Fold and assemble these shapes normally. Note that you are required to 'reverse fold' along the dotted line for the shape on the right (that is, fold inwards, so that you cannot see the printed line you are folding along).
After that, glue them into their respective positions on the engine.
.jpg)
- Next, we will make the vents. This is a little tricky, and again, there are no step-by-step pictures, but maybe the before and after shots will help.
First, you need to cut out the vent frame and the individual vent pieces from the engine sheet (make sure to cut out the centre-piece of the vent frame).
.jpg)
- Then, assemble the frame and cut along the dotted lines once the frame is glued together. After that, insert the vent pieces into their slots and then slip the vent onto the end of the engine.
.jpg)
- While you're building the engine, stick on details as you see fit (for example - the rectangles on the side of the engine in the above picture).
- After you're satisfied with your engine, cut out the connector piece.
.jpg)
- Assemble the shape as normal. In this case, the 1.5mm rectangle was ignored. Once assembled, glue the shape within the rectangular outline, ensuring the hooked' part is at the bottom.
.jpg)
- Finally, attach this engine to the rear part of the main hull.
.jpg)
5- Repeat Step 4 to assemble the other engine.
.jpg)
6- Now comes the hardest part of the entire project, joining the two halves. Unfortunately, it doesn't seem like the two halves actually fit together - and if they do, we haven't figured out how. Therefore, this particular step requires a degree of improvisation.
.jpg)
- Start by joining the bottom of the two halves.
.jpg)
.jpg)
.jpg)
- Then glue on the tabs, and cover up any gaps you see with paper. Easier said than done.
.jpg)
.jpg)
.jpg)
- [OPTIONAL] If you feel up to it, or, like the maker of this model, don't like the boxy shape of the template, you can cut out two paper triangles, and glue them like a slide between the 'nose ridge' and the 'wings'.
.jpg)
7- To finish off the main body, cut out and assemble the hatch from page 1.
.jpg)
.jpg)
- For increased customise-ability, reinforce the hatch-top with cardboard, and use the same method we used for the burst cannon to allow the hatch-top to be swapped out for a turret at a later date.
.jpg)
- After that, glue the hatch on the tank.
8- Finally, all that is left is to finish are the gun drones. First, cut out the gun-drone pieces from page 1. Make sure to glue the parts labelled 'top' and 'bottom' to cardboard for extra thickness.
.jpg)
- Then assemble the circled piece normally and glue it within the outlined shape on the 'bottom' piece.
.jpg)
.jpg)
- Cap this piece with the 'top'.
.jpg)
- The next, and last step is to assemble the guns, attach them, and glue on the last few details. Making the weapons is a simple matter of folding the details around the main body of the gun like so:
.jpg)
And there you have it, a devilfish scratch built from paper and cardboard! Scroll down for pictures of the finished, painted model.
%2B(1).jpg)
%2B(2).jpg)
%2B(3).jpg)
%2B(4).jpg)
.JPG)
.JPG)
.JPG)
.JPG)
.JPG)
While I do see that a few of the steps in here are a little vague, I hope that the pictures that are here will be enough to clear up what needs to be done to make this template work.
Should you require any further explanation as to how this template goes together, discover any useful additions to the template, or find something we've missed, feel free to e-mail.
Until then, happy scratch building!
40k Pirate
All associated marks, names, races, race insignia, characters, vehicles, locations, units, illustrations and images from the Warhammer 40,000 universe are either ®, TM and/or © Copyright Games Workshop Ltd 2000-2015, variably registered in the UK and other countries around the world. Used without permission. No challenge to their status intended. All Rights Reserved to their respective owners.
This tutorial shows you how to complete a slightly more difficult scratch build from the Paperhammer archive - the devilfish transport. Of course, with slight modifications and the addition of a turret, this could also serve as the body for a skyray or hammerhead tank.
.JPG)
I apologise in advance for any unclear or confusing steps in this tutorial. I did not build this model myself, but am typing up the tutorial from pictures and notes taken by my brother. I tried my best, but if you find a step that doesn't make sense, feel free to shoot me an e-mail and I'll ask my brother to clarify it.
With that out of the way - on with the tutorial!
What you will need:
-PaperHammer 40k.rar (Credit to the Golden Bolter Society)
-Paper and/or cardboard (In this tutorial everything was printed on 200GSM paper-card, with cereal box used here and there as reinforcing.)
-Scissors, knives and any other pointy, sharp objects you can find!
-Paper glue (I use super glue)
-Tooth picks
-Bamboo skewer (Realistically you could use any appropriately sized solid cylindrical object.)
1- First, find the devilfish template in 'PaperHammer 40k\Tau\Devilfish', and cut out the front part of the main hull from page 2.
.jpg)
- Then fold down along the black lines, away from yourself, so you can see the black line as you fold.
Reverse the fold along the dotted lines, so that you are folding towards yourself, and you cannot see the dotted lines as you fold.
(TIP: When working with paper-card I have learnt that gently scoring along the lines before you fold makes for a much neater fold. Of course, you then have to be careful not to cut all the way through the paper.)
- Glue the 'nose' together like so:
- Cut out these strips. There should be a pair at the top and bottom of page 2.
- Glue these strips to the 'inside' of each wing, and use them to join the top and bottom half of the piece.
.jpg)
.jpg)
.jpg)
- At this point cardboard was added for extra support.
.jpg)
- Finally, cut out and glue on the details from page 2 finish off the front part of the main hull.
.jpg)
.jpg)
.jpg)
(Notice the template recommends cutting out that bit there - we don't.)
.jpg)
2- Next, cut out the burst cannon pieces from page 2, and prepare four toothpicks by blunting them and cutting them all to the same size.
.jpg)
- Unfortunately, no step-by-step pictures were taken during the building of the burst-cannon, but it looks fairly straight-forward. First, fold the 'flower'-looking-piece and cap it with the octagon to it's right. Then, poke holes through the small circles on the burst-cannon barrel-pieces, and run the toothpicks through them to form the barrel (make sure it looks the same as the drawn diagram on page 2).Finally, assemble the rectangular prism, glue the face to the back of the burst-cannon, and use it to attach the two pieces.
.jpg)
- At this point we chose to attach the burst-cannon to the front of the main body. While you could just glue it, we prefer to have the ability to remove and rotate weapons. To achieve this, use a chopstick to poke a hole in the burst-cannon, but leave the chopstick in the hole. Then, position the burst-cannon where you would like it to be. Once you've found a good position, remove the chopstick from the burst-cannon and glue it in place.
Finally, pour a layer of superglue on the top of the burst cannon, ensuring that plenty is applied to the edges of the hole you created. This should harden and make the joint more durable.
.jpg)
3- Now, cut out the back part of the main hull from page 3.
.jpg)
- Unfortunately no step-by-step instructions were taken for the assembly of this piece, but it looks like a relatively straight-forward shape (I have placed pictures from the next few steps here as well just to give you a better idea of the shape).
.jpg)
.jpg)
.jpg)
.jpg)
- Next, take the details from page 3 and add them to the roof.
- Then take the circular doors from page 3, cut them out, and glue them on the back and sides of the rear hull. To add extra detail, score along the dotted lines before gluing the doors on.
(Personally, I think the doors need to be glued to cardboard for extra thickness to make them stand out a little more. However, the maker of this particular model disagrees.)
.jpg)
.jpg)
.jpg)
- After that, cut out these box-like shapes and their accompanying 'cross bits'.
.jpg)
- Once again, there are no step-by-step instructions for the assembly of this part, but it looks to be a fairly simply prism shape.
.jpg)
- To finish off the rear hull details (for now) cut out the landing gear parts found in the top right-hand corner of page 3 (whether you bulk this particular detail out with cardboard is up to personal preference).
.jpg)
- These belong on the corners of the devilfish bottom, wrapping onto the back and side.
Cut out the inner box-like parts of the landing gear except for the part that is labeled '1.5mm'. You will need to glue the 'grid' to this part.
Once the grid is glued on, cut out and glue the rectangles into place on the 'grid'.
.jpg)
4- Now we will assemble the engines, starting with the left engine. Cut out the main engine body on page 5.
.jpg)
- Assemble by folding normally (so that the black line is visible as you fold) and gluing together like so:
.jpg)
- Next, cut out these two shapes from the engine sheet:
.jpg)
- Fold and assemble these shapes normally. Note that you are required to 'reverse fold' along the dotted line for the shape on the right (that is, fold inwards, so that you cannot see the printed line you are folding along).
After that, glue them into their respective positions on the engine.
.jpg)
- Next, we will make the vents. This is a little tricky, and again, there are no step-by-step pictures, but maybe the before and after shots will help.
First, you need to cut out the vent frame and the individual vent pieces from the engine sheet (make sure to cut out the centre-piece of the vent frame).
.jpg)
- Then, assemble the frame and cut along the dotted lines once the frame is glued together. After that, insert the vent pieces into their slots and then slip the vent onto the end of the engine.
.jpg)
- While you're building the engine, stick on details as you see fit (for example - the rectangles on the side of the engine in the above picture).
- After you're satisfied with your engine, cut out the connector piece.
.jpg)
- Assemble the shape as normal. In this case, the 1.5mm rectangle was ignored. Once assembled, glue the shape within the rectangular outline, ensuring the hooked' part is at the bottom.
.jpg)
- Finally, attach this engine to the rear part of the main hull.
.jpg)
5- Repeat Step 4 to assemble the other engine.
.jpg)
6- Now comes the hardest part of the entire project, joining the two halves. Unfortunately, it doesn't seem like the two halves actually fit together - and if they do, we haven't figured out how. Therefore, this particular step requires a degree of improvisation.
.jpg)
- Start by joining the bottom of the two halves.
.jpg)
.jpg)
.jpg)
- Then glue on the tabs, and cover up any gaps you see with paper. Easier said than done.
.jpg)
.jpg)
.jpg)
- [OPTIONAL] If you feel up to it, or, like the maker of this model, don't like the boxy shape of the template, you can cut out two paper triangles, and glue them like a slide between the 'nose ridge' and the 'wings'.
.jpg)
7- To finish off the main body, cut out and assemble the hatch from page 1.
.jpg)
.jpg)
- For increased customise-ability, reinforce the hatch-top with cardboard, and use the same method we used for the burst cannon to allow the hatch-top to be swapped out for a turret at a later date.
.jpg)
- After that, glue the hatch on the tank.
8- Finally, all that is left is to finish are the gun drones. First, cut out the gun-drone pieces from page 1. Make sure to glue the parts labelled 'top' and 'bottom' to cardboard for extra thickness.
.jpg)
- Then assemble the circled piece normally and glue it within the outlined shape on the 'bottom' piece.
.jpg)
.jpg)
- Cap this piece with the 'top'.
.jpg)
- The next, and last step is to assemble the guns, attach them, and glue on the last few details. Making the weapons is a simple matter of folding the details around the main body of the gun like so:
.jpg)
And there you have it, a devilfish scratch built from paper and cardboard! Scroll down for pictures of the finished, painted model.
%2B(1).jpg)
%2B(2).jpg)
%2B(3).jpg)
%2B(4).jpg)
.JPG)
.JPG)
.JPG)
.JPG)
.JPG)
While I do see that a few of the steps in here are a little vague, I hope that the pictures that are here will be enough to clear up what needs to be done to make this template work.
Should you require any further explanation as to how this template goes together, discover any useful additions to the template, or find something we've missed, feel free to e-mail.
Until then, happy scratch building!
40k Pirate
All associated marks, names, races, race insignia, characters, vehicles, locations, units, illustrations and images from the Warhammer 40,000 universe are either ®, TM and/or © Copyright Games Workshop Ltd 2000-2015, variably registered in the UK and other countries around the world. Used without permission. No challenge to their status intended. All Rights Reserved to their respective owners.
Subscribe to:
Posts (Atom)