
Secondly, the blog is going to go quiet for a while. I don't intend to upload any more printable proxy figures, however, I will endeavour to keep the collection online.
Also, I won't be updating this blog for quite some time. While I do intend to post some more scratch building tutorials, it is likely to be months and/or years before this happens.
Sorry if this disappoints anyone, and thanks to all my (six) readers who have stuck with me so far!
Anyway, enough babbling on - on with the tutorial!
Now, this particular design of sentinel should look something like this:

(Could not find the owner of this picture. If you own this image and wish to have it removed from my site, please send me an email - contact details can be found on the side tab.)
As I said, I'm not a huge fan of this design. In my opinion it's just a little too boxy. However, the upside is that you can easily put this together as a standard sentinel instead of an armoured one. I guess it all comes down to personal taste.
For this project you will need:
-PaperHammer 40k.rar (Credit to the Golden Bolter Society)
-Paper and/or cardboard (I printed the templates on 200GSM paper-card, and used cereal boxes as re-enforcing)
-Scissors, knives, sharp cutting utensils....
-Paper glue (I'm a fan of super glue!)
-Tooth picks and/or bamboo skewers
1- Open PaperHammer 40k.rar
*Navigate to PaperHammer 40k\Imperial Guard\Sentinel
*Print 'Sentinel - Parts.pdf' (I used 200GSM paper-card)
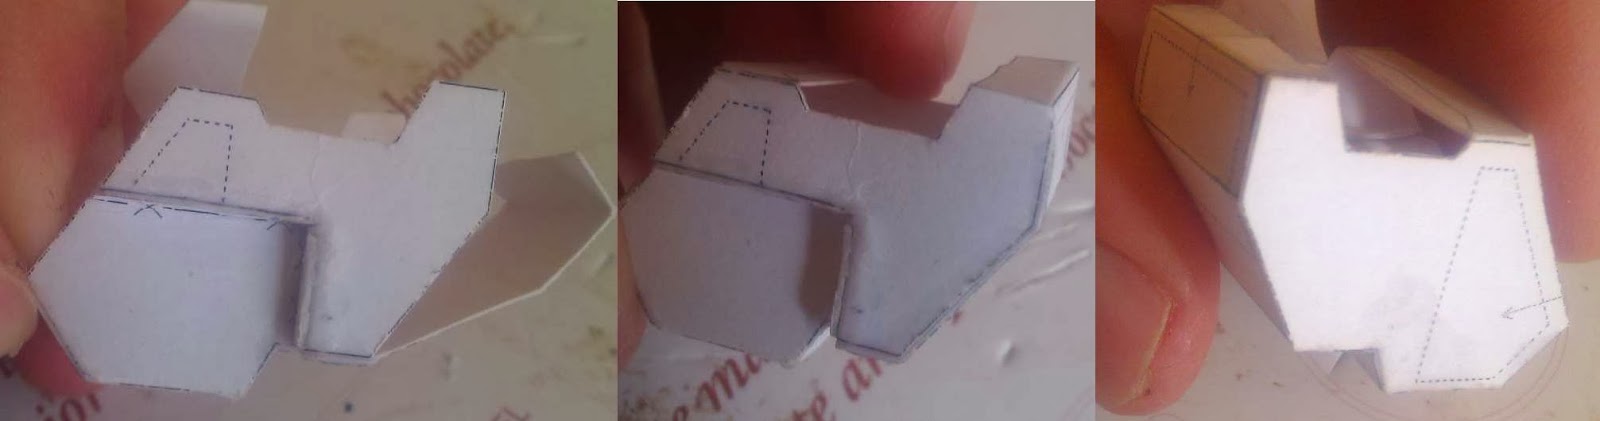
2- Cut out the main 'head' piece, located in the bottom left of the document. Fold 'away from you' along the solid black lines (so the line is still visible during the fold) - except for the black lines marked with an X, these should be folded the opposite way.
.jpg)
- Bring the sides of the head up to meet the front.....
.jpg)
- ...and 'follow it around' like so:
.jpg)
- Next, cut out this piece:

- You need to fold normally along the black lines, then put it in the 'seat' on the sentinel's left side. After the glue is dry (or before, if you are brave), you will be able to 'shut the lid' over the front, and close up the back of the sentinel.
.jpg)
- Next, cut out the piece directly underneath where the main head piece was located, fold it down the middle along the black line, and use it to cover up the gap in the front.
.jpg)
3- With the basic structure of the head finished, we'll add the basic parts of the exhaust vents. First, cut out this piece:

- After that, fold it normally - then glue the sides of the tabs together like so:

- This then goes onto the back of the sentinel, within the dotted lines.
.jpg)
- Now, cut out this piece:

- As you fold it you start to see how it goes together. This is a fairly basic shape, with the bottom tab forming a flat base, and the top tab on an angle to create the topmost face.
.jpg)
- I'm pretty sure that this goes on the back of the sentinel, on top of the last piece that we stuck on.
.jpg)
- To finish off the exhaust you could add exhaust vents using either rolled up paper, plastic tubes or chopsticks, and maybe some cardboard armour plating like in my other sentinel tutorial. But as I don't intend to be using this sentinel, I'm not going to go into that detail.
4- The armoured cockpit is fairly simple to construct, though I found it tricky to put on. If you are as imprecise as me, then you'll need to trim the cockpit to match your sentinel's body (and may also need to use pieces of paper to cover a few gaps).
.jpg)
- After the cockpit is in place, you can flesh it out with some detail.
.jpg)
5- You'll notice that the weapon for this sentinel is assembled very similarly to the one in my other tutorial, so I will not explain how to assemble it here.
- As the legs I used for my first sentinel tutorial are from this template, I will copy the instructions here.
- First, you need to print 'Sentinel - Parts.pdf'. (Preferably on about 200 GSM paper)
- These are the main leg pieces (Note that there aren't any tabs in this template, so it can be a little fiddly to put together sometimes):
.jpg)
- First, take the piece on the right, and fold normally along the black lines. Then, bring the short 'pokey-out-bit' in to meet the sides like so:
.jpg)
- Next, simply 'close the lid' with the other side, making sure to form a right-angle between the two circular ends.
.jpg)
- Now cut out the 'structure' that has a rectangular end, glue it to cardboard and then glue it within the dotted lines like so:
.jpg)
- Then, cut out this piece....

- ...glue the small rectangles onto the larger rectangle (within the dotted lines)...
.jpg)
- ...and glue this around the curved end of the first leg piece.
.jpg)
- Technically, this piece is complete, however, I chose to add a few finishing touches.
.jpg)
- Now, take the other leg piece and fold normally along the black lines - so that you can still see the black line as you fold. There's no trick to putting this part together, it's a fairly basic shape.
.jpg)
- Then cut out the 'structure'...

- ... and stick it in the dotted lines like so:
.jpg)
- Now you get to do it all again! Repeat all of step 5 to assemble the pieces for the other leg.
And there you have it! With a bit more effort than I put in to this tutorial, you could have a sentinel that looks something like this:

So 'appy scratchbuildin' and fair winds fer ye 'till I retuuaarrrn!
Aargh!
40k Pirate
All associated marks, names, races, race insignia, characters, vehicles, locations, units, illustrations and images from the Warhammer 40,000 universe are either ®, TM and/or © Copyright Games Workshop Ltd 2000-2014, variably registered in the UK and other countries around the world. Used without permission. No challenge to their status intended. All Rights Reserved to their respective owners.