
After a life/circumstance induced hiatus from miniatures, I was ready to get back into the hobby with a vengeance! Unfortunately, by the time I finished building this Armoured Sentinel life started getting in the way again, and it looks like I won't have time for the hobby for the next three months.
Oh well, on with the tutorial.
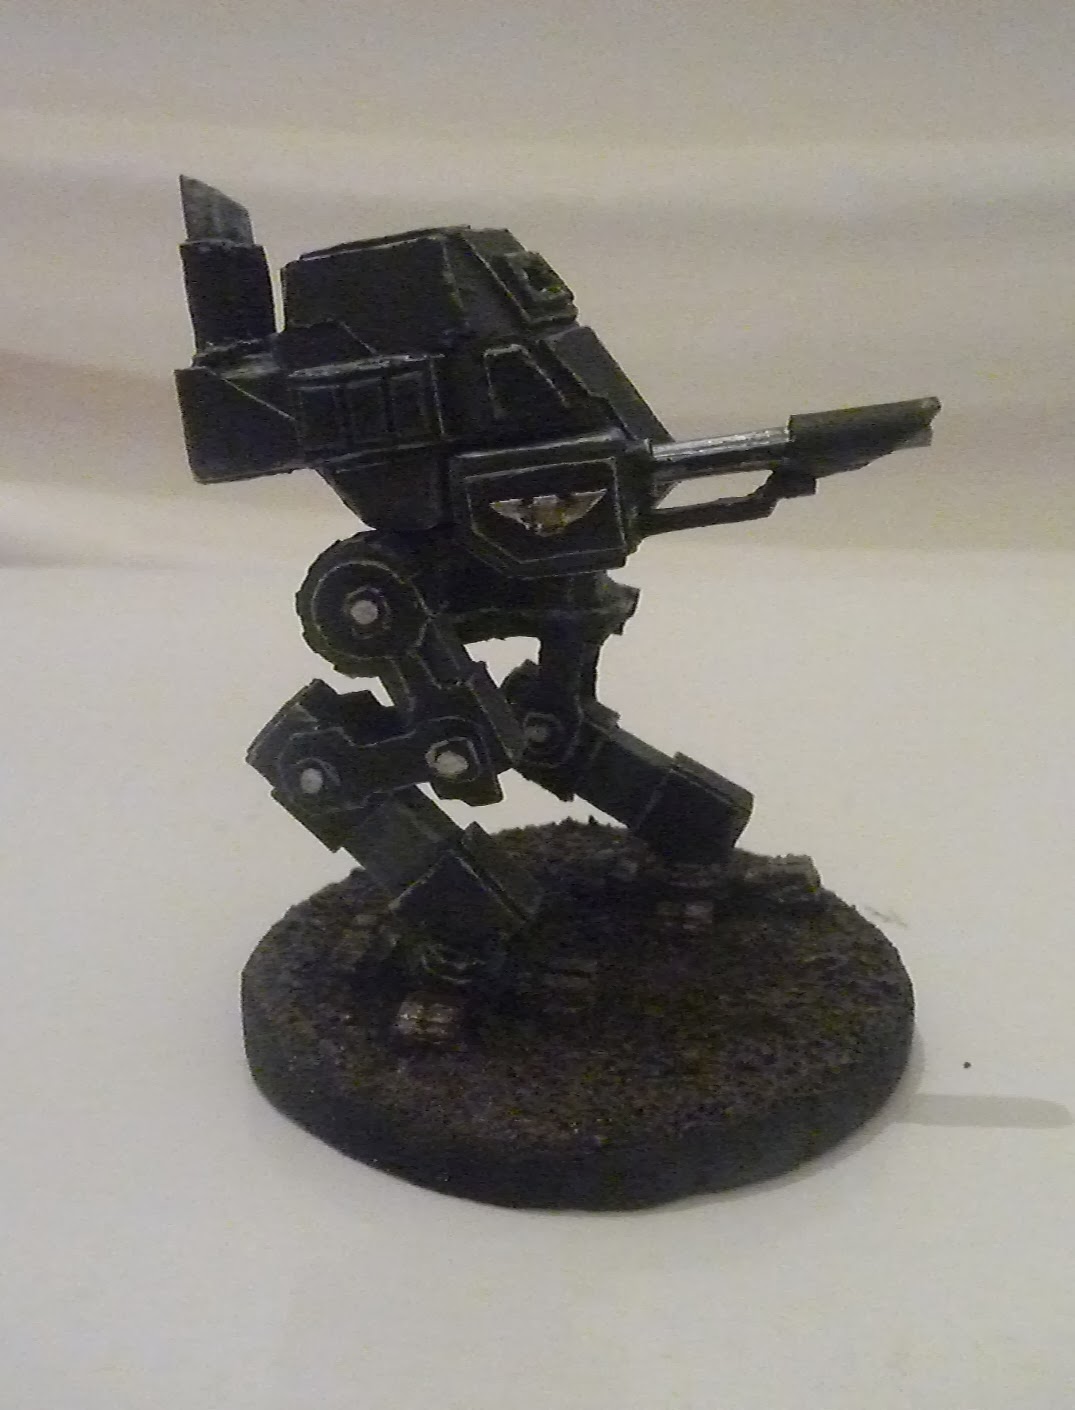
In the end, I'd like my armoured sentinel to look something like this. This particular sentinel was scratch built by ChadaFACE over at Mod DB.

For this project you will need:
-PaperHammer 40k.rar (Credit to the Golden Bolter Society)
-Paper and/or cardboard (I printed everything on 200 GSM paper-card, and used cereal boxes as re-enforcing.)
-Scissors, knives and any other pointy, sharp objects you can find!
-Paper glue (I use super glue)
-Tooth picks and/or bamboo skewers
1- Open PaperHammer 40k.rar
*Navigate to PaperHammer 40k\Imperial Guard\Sentinel
*Print 'Sentinel 01 - Part 01 of 02.gif' and 'Sentinel 01 - Part 02 of 02.gif' on 200 GSM paper-card. (This thickness is not compulsory, however I prefer it's strength over standard paper.)
2- We'll start with the sentinel's 'head' on page 1. Cut around the outside, making sure to cut along the highlighted red lines.

- Once the head is cut out, fold along the black lines - away from you so the black lines are still visible when you fold. Fold the opposite way when folding along the highlighted blue line - fold it 'towards you' so that the black line cannot be seen while you fold.
.jpg)
- Start to bring it all together, and you can begin to see the basic form of the head:

- First, glue the front panels together.
.jpg)
- Then glue the sides to the top of the head like so:
.jpg)
- If you'd like your sentinel to be as sturdy as possible, it's a good idea to re-enforce the inside with cardboard.

.jpg)
- ...and follow it around, gluing down the rest of the tabs.
.jpg)
- Now you need to cut out the 'face' (or 'nose', or 'front armour plating' or whatever you want to call it).
.jpg)
- To get that 'armoured' look, you'll want to stick the smaller pieces onto some cardboard before gluing them onto the larger piece (I didn't realise this until after I stuck them on!). Once they're glued on, fold along the black line.
.jpg)
- And then just stick it on (easier said than done!)
.jpg)
- About now you may be wondering about the giant hole in the side of your sentinel. This is where the gun will go, but it's a good idea to cover the hole up anyway - both for strength, and so it's easier to attach the gun later.
.jpg)
- And there you have it, the basic head structure. If yours doesn't seem very straight (like mine) then now would be the best time to try and fix it up. Otherwise, I don't think it effects the overall look too much.
.jpg)
3- Next we'll move on to the hips. Cut out a and fold it normally (folding along the black lines, down, away from you, so the black line is still visible when you fold.) Do not fold along the dotted lines.

- Glue the smaller tabs to the larger tabs on each side, making a sort of pentagonal prism.
.jpg)
- Then, cut out e and glue it onto a cereal box. (As the base of the hips, this piece needs to be thick. If you're not using 200 GSM paper, then maybe you should stick it onto two layers of cereal box cardboard)
- Once the glue is dry, cut it out again and fold normally all along the middle line, then glue the two halves together.
.jpg)
- Now cut out d and glue it onto a piece of cereal box cardboard. Then cut it out and glue it onto another piece of cardboard. Continue until d is approximately 5mm tall, then glue it into position within the dotted lines on e.
.jpg)
- Cut out c and glue it onto cereal box cardboard as well, then stick it on the opposite side to d within the dotted lines.
- Next, cut out b, and stick the thinner strips onto the wider strips within the dotted lines. You may fold normally along the black lines (not the dotted lines) before or after you do this.
.jpg)
- Now take a, and stick it to e in the dotted lines. Then, take b and stick them onto a within the dotted lines as well. (NOTE: It is quite possible that b will not stretch all the way around a, if this is the case, you can choose to cut out some cardboard to fill the gap, or leave the gap facing d where no one will notice it - I chose to do the latter.)
.jpg)
- I'm making my sentinel with a rotating/removable head. In order to do so, chop off a piece of a skewer (a chopstick or even a toothpick would probably work as well) and stick it in the middle of d. Then use the skewer to make a hole in the bottom of the head.
.jpg)
(Yes, that's blood on the back. Turns out hobby knives cut into flesh just as easily as cardboard!)
4a- With the hips complete it's time to move down to the legs. I'm not entirely sure how the legs go together with this template, so I'm just going to give a brief run-down of how I think the components are assembled, then move onto more detailed instructions on how to assemble a different leg template.
- Cut out this section, making sure to cut along the highlighted red lines.

- Then fold normally along the black lines, and assemble.
- Next, cut out the '2mm parts', stick them to cardboard and glue them onto the piece you just assembled.
.jpg)
- Now, cut out the main leg piece, making sure to cut along the red, highlighted line.

- Then fold and assemble.
.jpg)
- Unfortunately, I can't quite figure out how to put all these together. My closest attempt was this:
.jpg)
However, as you can see it still doesn't look quite right. So I decided the best course of action was to give up, and try something else!
4b- For all of my sentinels, I used the legs from the second sentinel design. First, you need to print 'Sentinel - Parts.pdf'. (Preferably on about 200 GSM paper)
- These are the main leg pieces (Note that there aren't any tabs in this template, so it can be a little fiddly to put together sometimes):
.jpg)
- First, take the piece on the right, and fold normally along the black lines. Then, bring the short 'pokey-out-bit' in to meet the sides like so:
.jpg)
- Next, simply 'close the lid' with the other side, making sure to form a right-angle between the two circular ends.
.jpg)
- Now cut out the 'structure' that has a rectangular end, glue it to cardboard and then glue it within the dotted lines like so:
.jpg)
- Then, cut out this piece....

- ...glue the small rectangles onto the larger rectangle (within the dotted lines)...
.jpg)
- ...and glue this around the curved end of the first leg piece.
.jpg)
- Technically, this piece is complete, however, I chose to add a few finishing touches.
.jpg)
- Now, take the other leg piece and fold normally along the black lines - so that you can still see the black line as you fold. There's no trick to putting this part together, it's a fairly basic shape.
.jpg)
- Then cut out the 'structure'...

- ... and stick it in the dotted lines like so:
.jpg)
- Now you get to do it all again! Repeat all of step 4b to assemble the pieces for the other leg.
5- With the main leg components assembled, we'll make a foot to go with it. First, cut out the main foot piece. (Found on 'Sentinel 01 - Part 02 of 02')
.jpg)
- Cut out the 'first layer' of toes (the large blank squares), and glue them into place on top of the toe sections.
.jpg)
- Then, cut out the 'second layer' of toes (the squares with smaller squares on them) and glue them on top of the first.
.jpg)
- Finally, to finish off the toes, cut out the smaller squares, and glue them in the dotted lines.
.jpg)
- Now the sentinel has toes, we'll make the ankle. First, cut out the ankle pieces (it should be fairly obvious where to find these - they'll be the only thing left in the 'Feet' section.) Then, glue them together. It should be fairly clear where each piece goes - but just in case, here's a series of pictures to show you how it goes together.
.jpg)
- Once you've assembled the ankle, glue it onto the main foot piece like so:
.jpg)
- Finally, make the leg joint (how the lower leg will stick to the foot) by cutting out two small cardboard rectangles, and gluing them on the inside of the ankle.
.jpg)
- Repeat step 5 for the second foot.
6- It's about time to put all the pieces together, and finish off the legs. Start by gluing the lower leg to the foot.
.jpg)
- Next, cut out the remaining leg 'structure' on 'Sentinel - Parts.pdf', and use it to join the leg pieces. (I highly recommend dry-fitting them using glue-tack first)
.jpg)
- Once the leg is glued together, you can add rivets by cutting out cardboard circles, and sticking them in the dotted lines.
.jpg)
- Now all that's left to do is stick them onto the hips.
.jpg)
(You can see here that I've used glue-tack, this way I can fiddle around with the pose a bit)
7- Next, we'll add detail to the sentinel's head, starting with the pharmacy and battery boxes.
- First, cut out the main battery box piece (it's under the heading 'Battery' on 'Sentinel 01 - Part 01 of 02') and fold normally along the black lines.
.jpg)
- The battery box folds like a basic, rectangular prism.......
.jpg)
- .....and goes inside the dotted lines on the right side of the sentinel's head.

- Next, take the rest of the pieces in the 'Battery' section of the sheet, and glue them to cardboard (except the piece labelled '2mm part', I have no idea what to do with that!). Then, simply glue the pieces into their spots within the dotted lines.
.jpg)
- The pharmacy box has less parts than the battery box, and is also simpler to make. Like the battery box, start by cutting out the main piece in the 'Pharmacy box' section of the sheet, and fold normally along the black lines.
.jpg)
- Similar to the battery box, the pharmacy box folds like a basic rectangular prism.......
.jpg)
(In the picture to the right you can see that either through poor folding or template design (probably the former), the 'lid' was a little too small, so the tab had to be cut to cover the gap.)
- ......and goes within the dotted lines on the left side of the sentinel's head.
.jpg)
- To finish off the pharmacy box, cut out the square (the only other piece in the 'Pharmacy box' section!) and stick it to cardboard, then glue it on the top of the box like so:
.jpg)
8- Now we need to flesh-out the sentinel a little with some armour plating. It should be pretty clear where each piece goes, but if you're having some trouble, I've put together a little series of pictures to help you out:

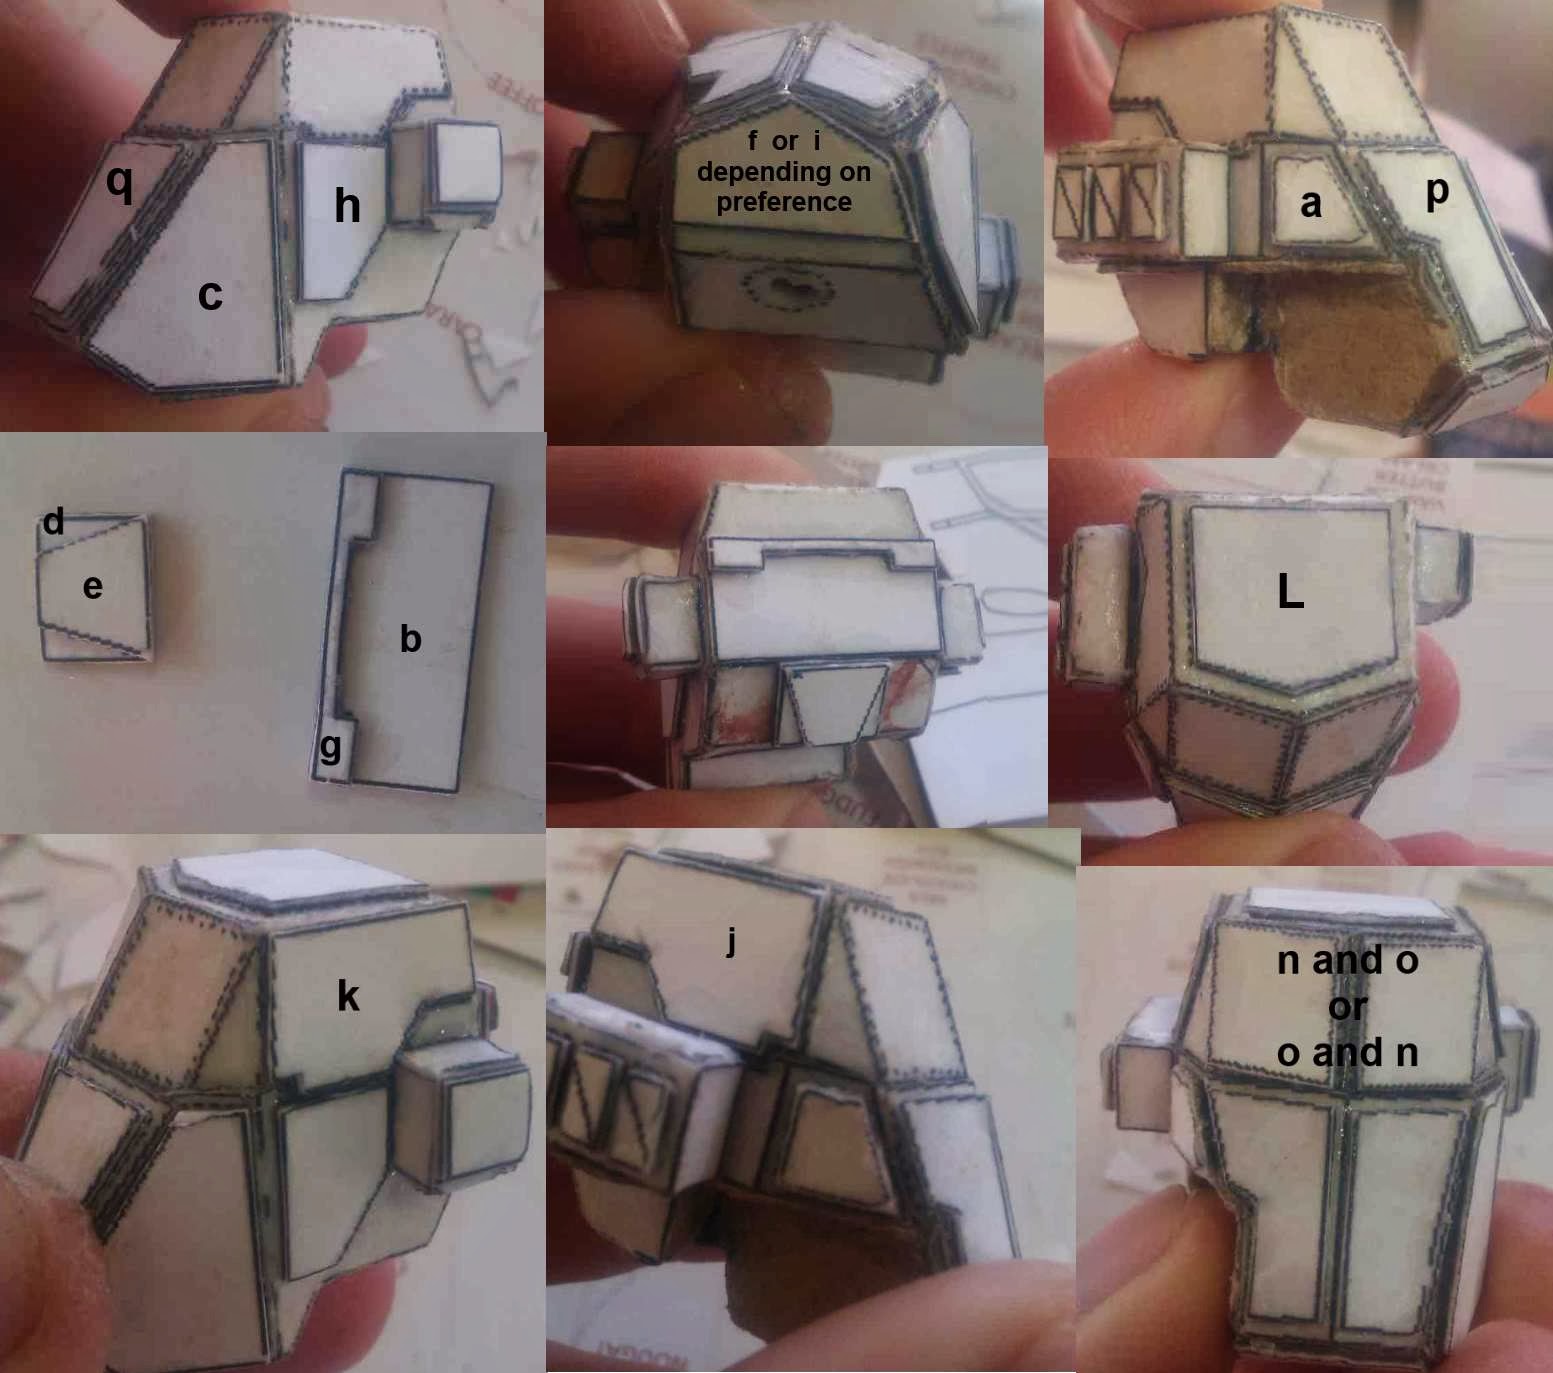.jpg)
9- Next we'll build the sentinel's exhaust vents. First, take the main piece (the piece at the very bottom of the 'Exhaust' section) and fold normally along the black lines.
.jpg)
- As you assemble it, you'll notice this piece folds similarly to the battery box.......
.jpg)
(..... except it appears to have no sides!)
- Use the two big squares in the 'Exhuast' section to cover this gap (NOTE: They may require trimming if you are as imprecise as me!)
.jpg)
- After that, cut out the 'backboard' (it has a weird little 'k' symbol next to it), stick it to cereal box cardboard, and fold along the two black lines near the base of the 'wings'.
.jpg)
- Then, cut out the piece that was directly above the 'backboard', glue it in the dotted lines.....
.jpg)
- .....and glue the 'backboard' to the back of the main piece.
.jpg)
- Next, cut out the two rectangular pieces (the ones with the dotted-line circles on them), stick them to cardboard, and glue them in the dotted lines on the main piece.
.jpg)
- The main piece is now finished, and ready to be glued on to the back of the sentinel like so:
.jpg)
- Once the main piece is securely glued on, we can move on to making the exhaust pipes themselves. I used bamboo skewers wrapped in cereal box cardboard for this. First, I cut lengths of skewer about 18mm long, angled the ends and hollowed out the angled ends with my knife. (NOTE: I've since discovered that knives are not an ideal drilling tool, nor is bamboo skewer the ideal building material.)
.jpg)
- I then cut rectangular pieces of cereal box cardboard approximately 11mm high, and wrapped the bamboo skewer bits.
.jpg)
- All that's left to do now is stick the exhaust pipes to the main exhaust piece. In theory, they should fit within the dotted lines on those rectangular pieces we stuck to the main piece earlier.
.jpg)
(NOTE: I stuck a thin cardboard strip around the bottom of the exhaust pipes as well - I think it looks better this way, but really, it's up to you.)
10- Right about now you may be wondering why I didn't continue adding detail to the head after step 8. Well, I got side-tracked, but now we're back, finishing off the detail on the head with door handles and windows.
You'll need this piece:
.jpg)
.jpg)
- The windows are very simple, just 8mm x 6mm cardboard rectangles. Before you ask, no, they're not included in the template (or maybe they are, and I just missed them!), however, I'm sure you can figure out how to make two small rectangles.
.jpg)
(NOTE: The window 'frame' is about 2-3mm thick)
(On another side-note, if anyone figures out a better window design, I'd be more than happy to hear it!)
(On another side-note, if anyone figures out a better window design, I'd be more than happy to hear it!)
11- The head is almost finished, all that's left is to make the gun. First, cut out the main 'Sentinel Lascannon' piece, and fold normally along the black lines.
.jpg)
- Assemble by gluing the tabs to the side like so:
.jpg)
- Now, there are two ways to mount the gun. There's the proper way:
.jpg)
- and the way that actually looks good:
.jpg)
.jpg)
(NOTE: If assembling the gun like me, you can't actually glue the armour pieces in the dotted lines, they have to be on the opposite side.)
- To make the barrel, you must start by cutting and shaping a length of bamboo skewer just like you did for the exhaust pipes (Except it needs to be approximately 24mm long instead of 18mm). Then, create a tube of cardboard, and cut the end to an angle like you did for the barrel of the gun. Glue this to the end of the barrel, but leave the end of the bamboo skewer sticking out.
After that, glue a thin strip of cardboard to the other end of the skewer, and connect the two ends with a thin piece of cardboard on each side (purely for aesthetics).
After that, glue a thin strip of cardboard to the other end of the skewer, and connect the two ends with a thin piece of cardboard on each side (purely for aesthetics).
.jpg)
- Next, glue the barrel onto the body of the gun (not in the dotted lines if you're assembling the gun like me!).
Follow this by gluing the '2mm part' onto cardboard, and placing it underneath the barrel.
.jpg)
Ta-daa! Now all that's left is to mount the gun, base and paint the sentinel, and it's ready for battle!
.jpg)

.jpg)
.jpg)
.jpg)
.jpg)
.jpg)
.JPG)
.JPG)
.JPG)
.JPG)
.JPG)
.JPG)
I hope you found my tutorial useful. If you have any questions regarding this tutorial or get stuck at any point, feel free to drop me a line.
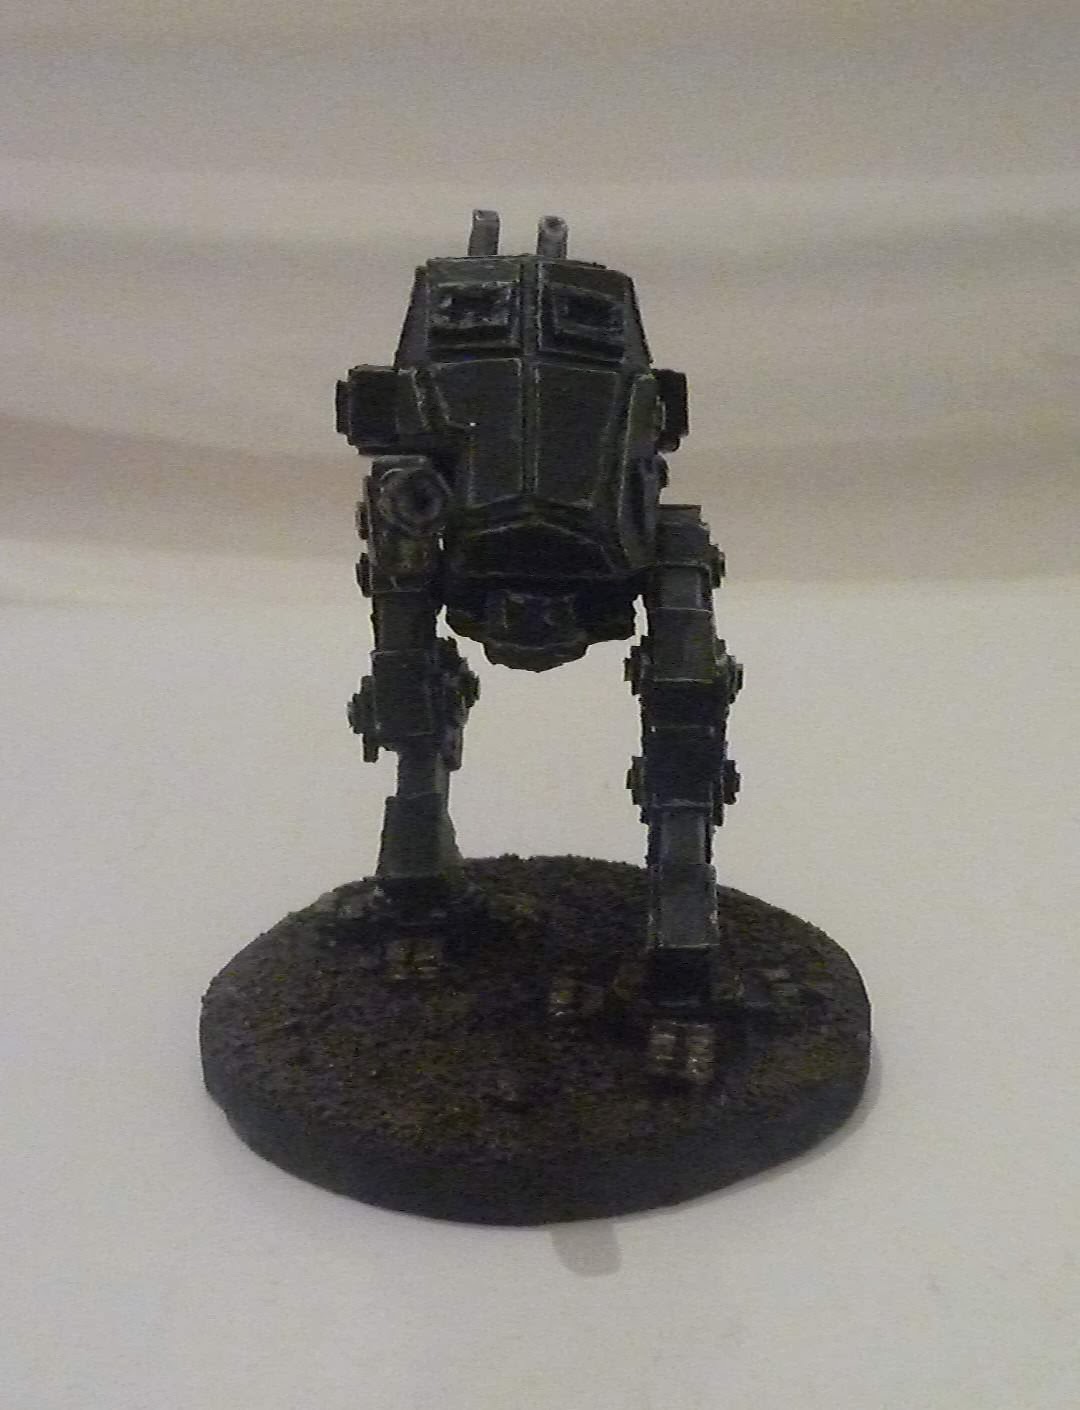
And that is how you scratch build an Armoured Sentinel using just cardboard, paper, skewers and a whole lot of super glue! You can see more pictures of the finished product below.
I hope you found my tutorial useful. If you have any questions regarding this tutorial or get stuck at any point, feel free to drop me a line.
Happy scratch-building!
40k Pirate
All associated marks, names, races, race insignia, characters, vehicles, locations, units, illustrations and images from the Warhammer 40,000 universe are either ®, TM and/or © Copyright Games Workshop Ltd 2000-2013, variably registered in the UK and other countries around the world. Used without permission. No challenge to their status intended. All Rights Reserved to their respective owners.