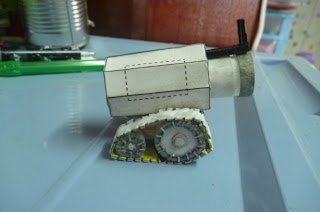
This isn't going to be so much of a tutorial as a series of WIP pics, as there is no real template to follow and I haven't got an idea what I'm doing!
1- I started with what seemed logical, the barrel. While I don't mind the 'multi-barrel' look of the official Thunderfire, I wanted something that would scream cannon! Rummaging through the bits and pieces in my desk drawer I found an old super glue lid that looked like it could make a good barrel with a bit of modification...


-I then glued a piece of cereal box cardboard around the rim.


-I found a piece of plastic I ripped off a dead computer which looks awfully similar to a sight, combined with a hexagon from a failed Predator turret and we have the basic shape of the cannon and main body. (Hexagon can be found in Predator Mk II - Part 01 of 01.gif in PaperHammer 40k.rar. Click on the 'Scratch Build Templates' link in the right sidebar or in the resources page.)

2- For the tracks I took the rhino tracks in 'Rhino MK II.pdf' and scaled them down to about 33%, backing them on cardboard for thickness.

-I then folded these into a circular shape to form two wheels...


-...and added details

3- With the tracks completed, I moved on to the piece that would join the cannon and tracks. Once again salvaging a piece from an old predator (it can be found on the same page as the hexagon), I extended it by adding a sloped front.

-I will use the end of a chopstick to attach the cannon to the above piece.

4- At this point I ran into a problem. I had not anticipated the amount of weight at the front, so the cannon tended to lean forward, lifting the back tracks off the ground. (It doesn't show very well in this photo, but the cannon was very unstable!)

-To try and put more weight over the back, I made two 'stabilisers' with a toothpick and some carboard.

5- Next I made the armour plating using the template below:


(NOTE: The bottom left of the template was trimmed to give the armour more of an angle.)
-A couple of Imperial symbols for decoration:

6- Now there is one thing missing, a way for the Techmarine to control his Thunderfire Cannon. I made the control panel out of a toothpick and some cardboard.

-Attached to the Thunderfire using yet another toothpick:

-A few minor details here and there, and it is done!

The Thunderfire was then basecoated and given away, so it is unlikely we will see a picture of the finished model.
All associated marks, names, races, race insignia, characters, vehicles, locations, units, illustrations and images from the Warhammer 40,000 universe are either ®, TM and/or © Copyright Games Workshop Ltd 2000-2012, variably registered in the UK and other countries around the world. Used without permission. No challenge to their status intended. All Rights Reserved to their respective owners.

No comments:
Post a Comment